Having blurry, out of focus, or generally poor quality photos from your Infinix GT 10 Pro’s camera can be incredibly frustrating. The camera may work fine one day, then suddenly start producing subpar images. Rest assured this is a common problem many users face, and there are ways to troubleshoot the root causes and improve photo sharpness again.

The camera blurriness could stem from a dirty lens, software bugs, focusing issues, or using the camera incorrectly. By methodically examining potential causes and making appropriate corrections, you can get your Infinix GT 10 Pro camera capturing crisp, clear shots once more.
Common Causes of Blurry Camera
A blurry camera usually indicates some underlying issue preventing the lens from achieving proper focus and clarity. Here are some of the most common causes:
- Dirty camera lens – Dust, fingerprints, debris on lens prevent sharp focus
- Outdated camera software/firmware – Bugs affect image processing
- Improper focus – Struggles to focus on close or moving objects
- Suboptimal settings – Incorrect ISO, shutter speed, white balance etc
- App conflicts – Third party apps interfere with camera
- Physical damage – Drops or bumps misalign optics
Identifying the specific factor resulting in blurry photos helps guide the appropriate troubleshooting steps.
Solutions to Blurry Camera
Before diving into solutions, ensure you are holding the phone still during capture and tapping to focus on the subject before shooting. Proper camera handling techniques can significantly improve clarity.
Clean the Camera Lens
Wiping away any dust, smudges, or debris on the Infinix GT 10 Pro’s rear camera lens using a microfiber cloth often resolves blurring issues. Even a small speck can interfere with light entering the lens and result in reduced sharpness. Clean it gently to avoid damaging the optics.
Here are the steps on how to clean the camera lens:
- Turn off the phone.
- Gently wipe the lens with a microfiber cloth.
- If the lens is still dirty, you can use a small amount of lens cleaning solution on the microfiber cloth.
- Be sure to dry the lens completely before using the camera.
By following these steps, you can clean the camera lens and improve the quality of your photos.
Here are some additional information about why cleaning the camera lens is necessary to fix the problem of blurry photos:
- The camera lens is responsible for focusing light onto the sensor. If the lens is dirty, it will not be able to focus the light properly and the photos will be blurry.
- The camera lens is also responsible for protecting the sensor from dust and debris. If the lens is dirty, it will not be able to protect the sensor properly and the photos may be damaged.
- By cleaning the camera lens, you can remove any dirt, dust, or debris that is preventing the lens from focusing properly. This will improve the quality of your photos.
Update Camera App and Firmware
Check the Play Store for any available updates to the Infinix camera app, as newer versions may have fixed underlying software bugs that affect image quality and processing. Also look for firmware updates for your specific device model, as they can optimize focusing and clarity.
Here are the steps on how to update the camera app and firmware:
- Go to the Settings menu.
- Tap on “System“.
- Tap on “System update“.
- Tap on “Online Update“.
- Wait until the update is successfully installed.
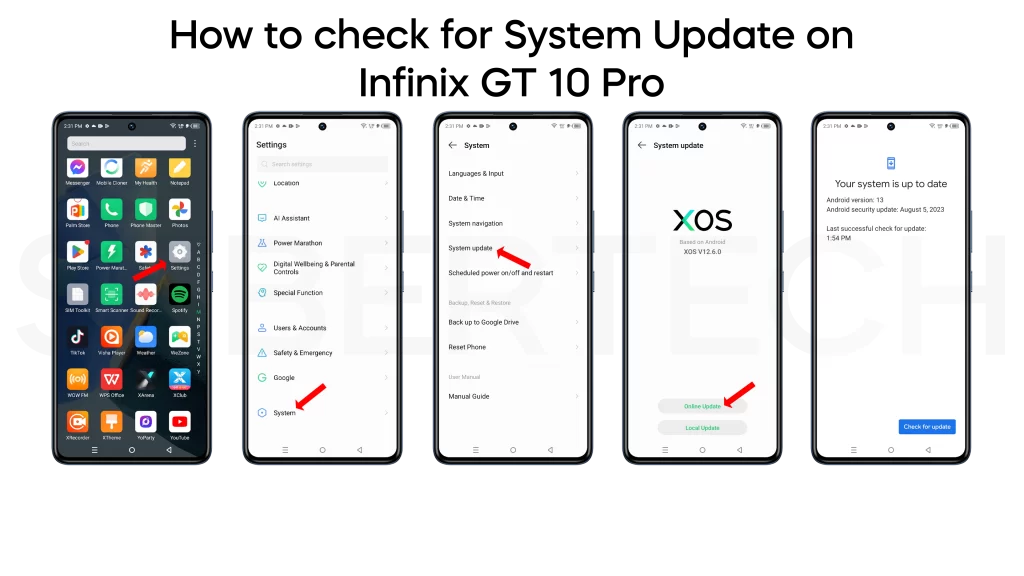
By following these steps, you can update the camera app and firmware and improve the quality of your photos.
Here are some additional information about why updating the camera app and firmware is necessary to fix the problem of blurry photos:
- Software bugs can sometimes cause the camera to focus incorrectly or produce blurry photos. By updating the software, you can fix these bugs and improve the quality of your photos.
- New features can be introduced in software updates that can help to improve the quality of photos. For example, new image stabilization or noise reduction features can help to produce sharper photos.
- By updating the camera app and firmware, you can ensure that you are using the latest version of the software and that you are getting the best possible quality of photos.
Adjust Camera Settings
Dive into the camera settings and adjust options like exposure value, ISO, white balance, etc to suit the lighting conditions. Auto mode may select suboptimal settings for your environment leading to blurring. Take control and manually configure the best settings.
Here are some of the camera settings that you can adjust to improve the quality of your photos:
- Focus: The focus setting determines how sharp the photo will be. You can set the focus manually or let the camera do it automatically.
- Exposure: The exposure setting determines how bright or dark the photo will be. You can adjust the exposure manually or let the camera do it automatically.
- White balance: The white balance setting determines how accurate the colors in the photo will be. You can set the white balance manually or let the camera do it automatically.
Here are the steps on how to adjust the camera settings:
- Open the camera app.
- Tap on the settings icon.
- Adjust the focus, exposure, and white balance settings.
By following these steps, you can adjust the camera settings and improve the quality of your photos.
Here are some additional information about why adjusting the camera settings is necessary to fix the problem of blurry photos:
- The wrong focus setting can cause the photos to be blurry. For example, if the focus is set to infinity, the photos will be blurry if the subject is close to the camera.
- The wrong exposure setting can also cause the photos to be blurry. For example, if the exposure is set too low, the photos will be blurry in low-light conditions.
- The wrong white balance setting can cause the colors in the photos to be inaccurate, which can make the photos look blurry.
By adjusting the camera settings, you can ensure that the photos are properly focused, exposed, and have accurate colors. This can help to improve the quality of your photos and reduce blurriness.
Ensure Adequate Lighting
Blurry shots often result from inadequate lighting which prevents fast shutter speeds. Move subjects into better lit areas indoors or outdoors. Avoid low light situations where the camera struggles to get sharpness at slow shutter speeds.
Here are some tips on how to ensure adequate lighting for your photos:
- Take photos in well-lit areas.
- Avoid taking photos in low-light conditions, such as at night or indoors.
- Use a flash if necessary.
- Use a tripod to keep the camera steady.
- Use a higher ISO setting to increase the sensitivity of the camera to light.
By following these tips, you can ensure that your photos are properly lit and reduce the chances of blurriness.
Here are some additional information about why ensuring adequate lighting is necessary to fix the problem of blurry photos:
- In low-light conditions, the camera needs more time to let in light. This can cause the photos to be blurry if the subject is moving.
- The flash can help to illuminate the subject in low-light conditions, but it can also cause the photos to be blurry if the flash is too close to the subject.
- A tripod can help to keep the camera steady in low-light conditions, which can help to reduce blurriness.
- A higher ISO setting can increase the sensitivity of the camera to light, but it can also increase the noise in the photos.
By ensuring adequate lighting, you can help to improve the quality of your photos and reduce blurriness.
Reset Camera App Data/Cache
From your device settings, locate the Camera app info page and clear data and cache which wipes corrupt files that could be interfering with proper camera operation. Resetting the app often irons out software glitches.
Here are the steps on how to reset the camera app data/cache:
- Go to the Settings menu.
- Tap on “Apps“.
- Find the camera app and tap on it.
- Tap on “Storage & cache“.
- Tap on “Clear cache“.
- Tap on “Clear storage“.
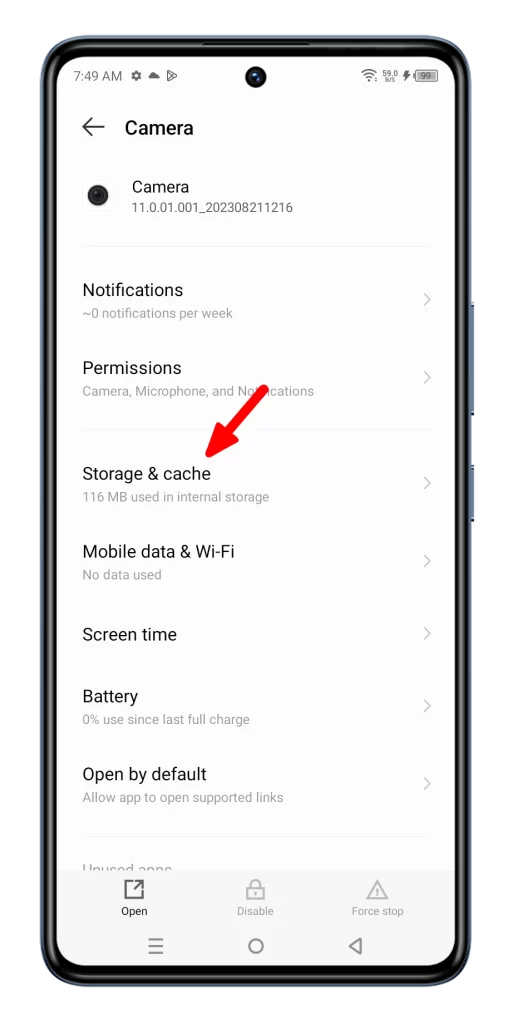
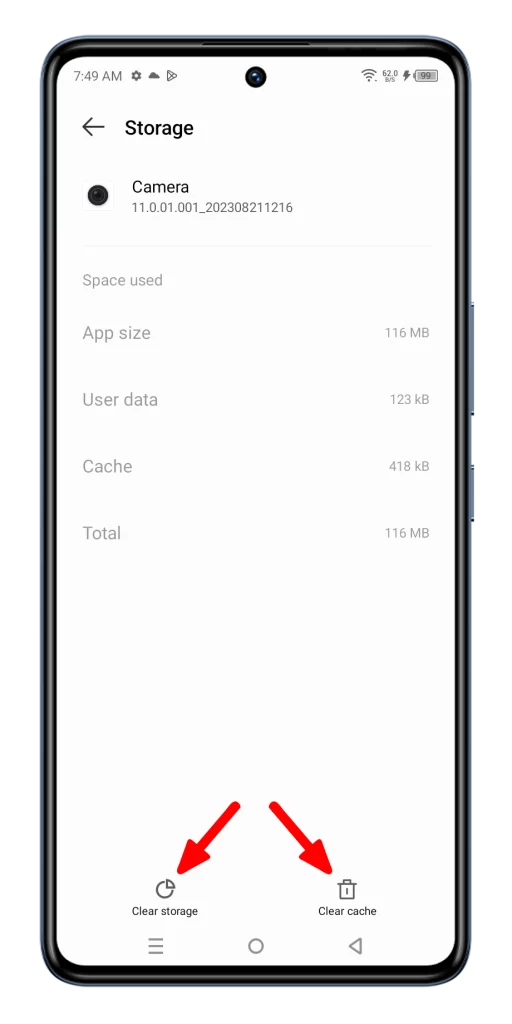
By following these steps, you can reset the camera app data/cache and fix the problem of blurry photos.
Here are some additional information about why resetting the camera app data/cache is necessary to fix the problem:
- The camera app data/cache can sometimes become corrupted due to a software bug or a problem with the app itself.
- Resetting the camera app data/cache will delete all of the app’s settings and data, but it will also reset the app to its default state. This can sometimes fix the problem and make the app work properly again.
- It is important to note that resetting the camera app data/cache will delete all of the app’s settings and data, so you will need to reconfigure the app and restore any photos or videos that you have saved.
Disable Other Camera Apps
It is not always necessary to disable other camera apps to fix the problem of blurry photos. However, if you have recently installed a new camera app and started experiencing blurry photos, then disabling the new app may help to fix the problem.
There are a few reasons why disabling other camera apps may help to fix the problem of blurry photos:
- The new camera app may be incompatible with your phone or may have a bug that is causing the blurry photos.
- The new camera app may be conflicting with the default camera app, which can also cause blurry photos.
To disable other camera apps, follow these steps:
- Go to the Settings menu.
- Tap on “Apps”.
- Find the camera app that you want to disable and tap on it.
- Tap on “Disable”.
Once you have disabled the other camera apps, try taking some photos with the default camera app to see if the problem is fixed.
If the problem is not fixed, then you may need to uninstall the new camera app or contact the developer for support.
Here are some additional information about why disabling other camera apps may be necessary to fix the problem:
- Some camera apps may not be compatible with all phones. If you have recently installed a new camera app and started experiencing blurry photos, then it is possible that the app is not compatible with your phone.
- Some camera apps may have bugs that can cause blurry photos. If you have recently installed a new camera app and started experiencing blurry photos, then it is possible that the app has a bug that is causing the problem.
- Some camera apps may conflict with the default camera app. If you have recently installed a new camera app and started experiencing blurry photos, then it is possible that the new app is conflicting with the default camera app.
By disabling other camera apps, you can help to troubleshoot the problem and identify the app that is causing the blurry photos. This can help you to fix the problem and take better photos with your phone.
Factory Reset Device
A factory reset is not always necessary to fix the problem of blurry photos. However, if you have tried all of the other troubleshooting steps and the problem is still not fixed, then a factory reset may be necessary.
A factory reset will erase all of the data on your phone, including your photos, videos, apps, and settings. This can be a drastic step, but it can sometimes fix problems that cannot be fixed in any other way.
Here are the steps on how to factory reset your phone:
- Go to the Settings menu.
- Tap on “System”.
- Tap on “Reset options”.
- Tap on “Erase all data (factory reset)”.
- Enter your PIN or password if prompted.
- Tap on “Erase all data”.
Once you have factory reset your phone, you will need to set it up again from scratch. This includes reinstalling all of your apps and restoring your photos and videos.
Here are some additional information about why factory resetting your device may be necessary to fix the problem:
- The problem may be caused by a software bug or corruption that cannot be fixed by other means.
- A factory reset will restore your phone to its original state, which can sometimes fix problems that have been caused by software updates or other changes to the phone’s settings.
- It is important to note that a factory reset will erase all of the data on your phone, so you should make sure to back up your data before you do a factory reset.
If you have tried all of the other troubleshooting steps and the problem is still not fixed, then a factory reset may be the only way to fix the problem. However, it is important to note that a factory reset is a drastic step and should only be used as a last resort.
With some dedicated troubleshooting and experimentation with different settings, techniques, and tools, you can markedly improve any blurry camera issues on the Infinix GT 10 Pro. Adjusting configuration, cleaning the lens, updating software, and employing more advanced shooting and editing apps will help restore fine focus and clarity in your photos.
FAQs
Why do my photos look blurry when I zoom in?
This is usually because the camera is not able to focus on the subject when you zoom in. This can be caused by a number of factors, such as low light or a moving subject.
Why do my photos look blurry when I take them in low light?
This is because the camera needs more light to take a sharp photo in low light. You can try using a flash or increasing the ISO setting, but this can also increase noise in the photo.
Why do my photos look blurry when I take them of moving objects?
This is because the camera is not able to keep up with the movement of the object. You can try using a faster shutter speed or a flash, but this can also freeze the motion of the object and make it look unnatural.
Why do my photos look blurry when I use the front-facing camera?
The front-facing camera is usually lower quality than the rear-facing camera, so it is more likely to produce blurry photos. You can try using a different camera app or adjusting the settings on your phone.
Why do my photos look blurry when I use a tripod?
A tripod can help to keep the camera steady, but it is not a guarantee that your photos will be sharp. You also need to make sure that the camera is properly focused.
Why do my photos look blurry when I use a professional camera?
Even professional cameras can produce blurry photos if they are not used properly. Make sure that you are using the right settings for the conditions and that you are holding the camera steady.
